Before connecting your app to the Cloud Firestore emulator, make sure that
you
understand the overall Firebase Local Emulator Suite workflow
,
and that you
install and configure
the Local Emulator Suite and review its
CLI commands
.
Choose a Firebase project
The Firebase Local Emulator Suite emulates products for a single Firebase project.
To select the project to use, before you start the emulators, in the CLI run
firebase use
in your working directory. Or, you can pass
the
--project
flag to each emulator
command.
Local Emulator Suite supports emulation of
real
Firebase projects and
demo
projects.
| Project type
|
Features
|
Use with emulators
|
| Real
|
A real Firebase project is one you created and configured (most likely
via the Firebase console).
Real projects have live resources, like database instances, storage
buckets, functions, or any other resource you set up for that Firebase
project.
|
When working with real Firebase projects, you can run emulators for any
or all of the supported products.
For any products you are not emulating, your apps and code will
interact with the
live
resource (database instance, storage
bucket, function, etc.).
|
| Demo
|
A demo Firebase project has no
real
Firebase configuration and
no live resources. These projects are usually accessed via codelabs or
other tutorials.
Project IDs for demo projects have the
demo-
prefix.
|
When working with demo Firebase projects, your apps and code interact with
emulators
only
. If your app attempts to interact with a resource
for which an emulator isn't running, that code will fail.
|
We recommend you use demo projects wherever possible. Benefits include:
- Easier setup, since you can run the emulators without ever creating a
Firebase project
- Stronger safety, since if your code accidentally invokes non-emulated
(production) resources, there is no chance of data change, usage and billing
- Better offline support, since there is no need to access the internet to
download your SDK configuration.
Instrument your app to talk to the emulators
On startup, the Cloud Firestore emulator creates a default database and a named
database for each
firestore
configuration in your
firebase.json
file
.
Named databases are also created implicitly in response to any SDK or
REST API calls to the emulator that reference a specific database. Such
implicitly-created databases operate with
open rules
.
To work with your default and named databases interactively in the
Emulator Suite UI, in your browser's address bar, update the URL to select
either the default or a named database.
- For example, to browse the data in your default instance, update the URL to
localhost:4000/firestore/default/data
- To browse in an instance named
ecommerce
, update to
localhost:4000/firestore/ecommerce/data
.
Set up your in-app configuration or test classes to interact with
Cloud Firestore as follows. Note that in the following samples, app code
is connecting to the default project database. For examples involving additional
Cloud Firestore databases beyond the default database, refer to the
guide for multiple databases
.
Kotlin+KTX
// 10.0.2.2 is the special IP address to connect to the 'localhost' of
// the host computer from an Android emulator.
val firestore = Firebase.firestore
firestore.useEmulator("10.0.2.2", 8080)
firestore.firestoreSettings = firestoreSettings {
isPersistenceEnabled = false
}
Java
// 10.0.2.2 is the special IP address to connect to the 'localhost' of
// the host computer from an Android emulator.
FirebaseFirestore firestore = FirebaseFirestore.getInstance();
firestore.useEmulator("10.0.2.2", 8080);
FirebaseFirestoreSettings settings = new FirebaseFirestoreSettings.Builder()
.setPersistenceEnabled(false)
.build();
firestore.setFirestoreSettings(settings);
Swift
let settings = Firestore.firestore().settings
settings.host = "127.0.0.1:8080"
settings.cacheSettings = MemoryCacheSettings()
settings.isSSLEnabled = false
Firestore.firestore().settings = settings
Web modular API
import { getFirestore, connectFirestoreEmulator } from "firebase/firestore";
// firebaseApps previously initialized using initializeApp()
const db = getFirestore();
connectFirestoreEmulator(db, '127.0.0.1', 8080);
Web namespaced API
// Firebase previously initialized using firebase.initializeApp().
var db = firebase.firestore();
if (location.hostname === "localhost") {
db.useEmulator("127.0.0.1", 8080);
}
No additional setup is needed to test Cloud Functions
triggered by Firestore events
using the emulator. When the Firestore and Cloud Functions emulators are both
running, they automatically work together.
Admin SDKs
The Firebase Admin SDKs automatically connect to the Cloud Firestore
emulator when the
FIRESTORE_EMULATOR_HOST
environment variable is set:
export FIRESTORE_EMULATOR_HOST="127.0.0.1:8080"
If your code is running inside the Cloud Functions emulator your project ID
and other configuration are automatically set when calling
initializeApp
.
If you want your Admin SDK code to connect to a shared emulator running in
another environment, you need to specify the
the same project ID you set using the Firebase CLI
.
You can pass a project ID to
initializeApp
directly or set the
GCLOUD_PROJECT
environment variable.
Node.js Admin SDK
admin.initializeApp({ projectId: "your-project-id" });
Environment Variable
export GCLOUD_PROJECT="your-project-id"
Clear your database between tests
Production Firestore provides no platform SDK method for flushing the database, but the Firestore emulator gives you a REST endpoint specifically for this purpose, which can be called from a test framework setup/tearDown step, from a test class, or from the shell (e.g., with
curl
) before a test is kicked off. You can use this approach as an alternative to simply shutting down the emulator process.
In an appropriate method, perform an HTTP DELETE operation, supplying your
Firebase projectID, for example
firestore-emulator-example
, to the following
endpoint:
"http://localhost:8080/emulator/v1/projects/firestore-emulator-example/databases/(default)/documents"
Naturally, your code should await REST confirmation that the flush finished or failed.
You can perform this operation from the shell:
// Shell alternative…
$ curl -v -X DELETE "http://localhost:8080/emulator/v1/projects/firestore-emulator-example/databases/(default)/documents"
Having implemented a step like this, you can sequence your tests and trigger
your functions with confidence that old data will be purged between runs and
you're using a fresh baseline test configuration.
Import and export data
The database and Cloud Storage for Firebase emulators allow you to export data
from a running emulator instance. Define a baseline set of data to use in your
unit tests or continuous integration workflows, then export it to be shared
among the team.
firebase emulators:export ./dir
In tests, on emulator startup, import the baseline data.
firebase emulators:start --import=./dir
You can instruct the emulator to export data on shutdown, either specifying an
export path or simply using the path passed to the
--import
flag.
firebase emulators:start --import=./dir --export-on-exit
These data import and export options work with the
firebase emulators:exec
command as well. For more, refer to the
emulator command reference
.
Visualize Security Rules activity
As you work through prototype and test loops, you can use visualization tools
and reports provided by the Local Emulator Suite.
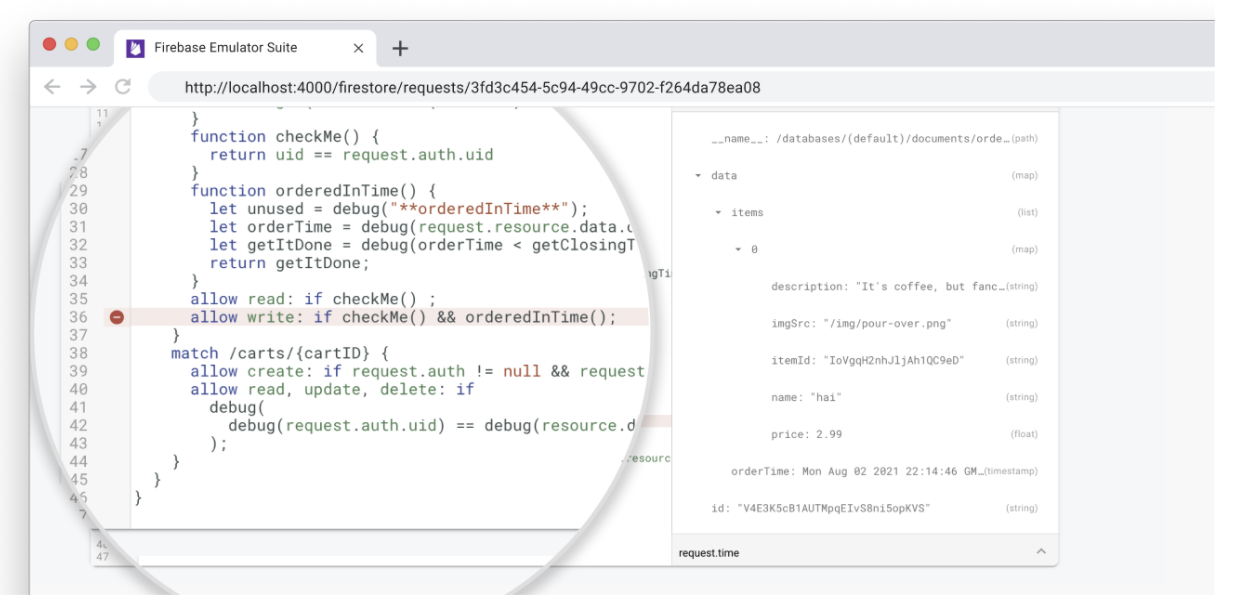
Use the Requests Monitor
The Cloud Firestore emulator lets you visualize client requests in
the Emulator Suite UI, including evaluation tracing for Firebase Security Rules.
Open the
Firestore > Requests
tab to view the detailed evaluation
sequence for each request.
Visualize Rules evaluations reports
As you add Security Rules to your prototype you can debug them with
Local Emulator Suite debug tools.
After running a suite of tests, you can access test
coverage reports that show how each of your security rules was evaluated.
To get the reports, query an exposed endpoint on the emulator while
it's running. For a browser-friendly version, use the following URL:
http://localhost:8080/emulator/v1/projects/
<database_name>
:ruleCoverage.html
This breaks your rules into expressions and subexpressions that you can
mouseover for more information, including number of evaluations and values
returned. For the raw JSON version of this data, include the following URL
in your query:
http://localhost:8080/emulator/v1/projects/
<database_name>
:ruleCoverage
Here, the HTML version of the report highlights evaluations that throw undefined and null-value errors:

How the Cloud Firestore emulator differs from production
The Cloud Firestore Emulator attempts to faithfully replicate the behavior
of the production service with some notable limitations.
Multiple database support for Cloud Firestore
Currently, the Emulator Suite UI supports interactive creation, editing,
deletion, request monitoring, and security visualization for a default database,
but not additional named databases.
However, the emulator itself does create a named database based on the
configuration in your
firebase.json
file and implicitly in response to SDK or
REST API calls.
Transactions
The emulator does not currently implement all transaction behavior
seen in production. When you're testing features that involve multiple
concurrent writes to one document, the emulator may be slow to complete write
requests. In some cases, locks may take up to 30 seconds to be released.
Consider adjusting test timeouts accordingly, if needed.
Indexes
The emulator does not track compound indexes and instead will execute any
valid query. Make sure to test your app against a real Cloud Firestore
instance to determine which indexes you will need.
Limits
The emulator does not enforce all limits enforced in production. For example,
the emulator may allow transactions that would be rejected as too large by the
production service. Make sure you are familiar with the
documented limits
and that you design your app to
proactively avoid them.
What next?
