Da bi dodali novo predlogo na stran, postavite kazalec na mesto, kamor jo ?elite vstaviti, in kliknite na ikono za vstavljanje (kos sestavljanke) v opravilni vrstici.
Then open the Vstavi menu and select "
 ?Predloga".
Alternatively, type two curly brackets {{ to open the same dialog. ?Predloga".
Alternatively, type two curly brackets {{ to open the same dialog.
|

|
| Find the template you want to insert by typing either its name or a relevant keyword.
Results containing the search term in either the name or description will display in a dropdown.
This should help you find a relevant template, even if you don’t know its exact name.
If you’re having trouble finding the kind of template you want by using keywords, you can look on other wiki pages with similar content and view or edit the page source to see which templates are in use.
When you find the desired template’s name, you can type it into this field to insert it here.
|

|
|
| You can also edit a template that’s already on a page.
When you select the template you want to edit, it turns blue, and a box appears displaying "
?Predloga".
Then select the "Uredi" link or double click on the template itself to open the template.
|
|
|
| Some templates are not visible to someone reading a page.
In the visual editor, such hidden templates are still shown so that you can click and edit or delete them.
The name of the template will be shown next to the puzzle icon and both will be grayed out.
|

|
|
|
Template parameters
|
You’ll see this dialog box when you’re adding a new template or editing one already in place.
What you see in the box depends on whether the template in question contains
TemplateData
, helpful metadata added by other editors to make it easier to edit templates in the Visual Editor.
When a template contains TemplateData, the VisualEditor can use it to present annotated fields for you to fill in.
For templates that have some community-provided TemplateData, the VisualEditor displays a list of the named parameters and, often, descriptions and instructions explaining the meaning and required format for each parameter’s values.
|
 Template parameters in the Visual Editor interface Template parameters in the Visual Editor interface
|
|
| You can disable any optional parameter (which have blue checkboxes on the left side).
If a parameter’s checkbox is grayed out and not clickable, the template requires that parameter, so it can’t be disabled.
When you insert a new template, you may find that some optional parameters are pre-selected.
That means the author(s) of the template recommends the use of those parameters.
It’s best to review all parameters that will be used in a template to ensure you understand their use.
Clicking an unchecked parameter adds it to the template.
Clicking a parameter that’s already been added takes you to the parameter’s input field.
Some template parameters will show as “deprecated”.
Don’t use deprecated parameters when inserting a template; they’re only visible to you because those parameters are in use on older pages where this template was included.
|
 Interface for adding more parameters to a template in the VisualEditor Interface for adding more parameters to a template in the VisualEditor
|
|
|
Adding undocumented parameters
|
| If you’re inserting or editing a template whose author hasn’t laid out its parameters in TemplateData, it has what we call “undocumented” or “unnamed parameters”.
In these cases, you should consult the page for the template itself.
There you can learn how to correctly employ and work with all of the template’s parameters.
This includes learning the exact names of the parameters as written by the template author.
If you find in the documentation that the template expects parameters without names, fill in numbers as placeholders for the parameter names using the undocumented parameter input, then add text to the values you want to provide as you normally would.
- first unnamed parameter: “1”
- first unnamed parameter’s value: “en_US”
- second unnamed parameter: “2”
- second unnamed parameter’s value: “yes”
If you accidentally include nonexistent, misspelled or erroneous parameters, the values you enter for those parameters won’t show up on the page you’re editing.
|
 Template without TemplateData in the Visual Editor Template without TemplateData in the Visual Editor
|
|
|
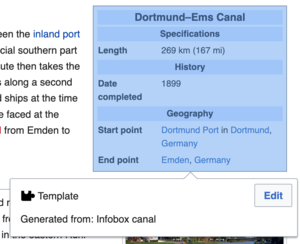
Autogenerated parameters
|
| In this example, the template in question lacks TemplateData but it was possible to autogenerate the parameters. This means that the undocumented parameters have already been added for you, but the names may not be easily understandable and the dialog cannot display any directions or descriptions.
As a result the dialog box provides a link to the template’s documentation, which should help you deduce and fill in the template’s various parameters.
|

|
|
|
Editing multi-part template content
|
| During editing, you may open template content consisting of multiple templates or a single template linked to some wikitext.
This differs from the nested templates described below.
In this case, the templates are better visualized as being stacked or connected.
This content often contains “unbalanced templates,” templates which are incomplete on their own and need to be paired with some wikitext or another template in order to function.
These related pieces of template content must be created in wikitext, but can be edited in the VisualEditor.
In these cases you will see a notice at the top of the dialog to signal the situation and a specialized toolbar will be visible at the bottom of the sidebar.
There you can use the icon buttons to add additional templates, additional wikitext, delete elements or change their order.
|
 Editing multi-part template content in the VisualEditor Editing multi-part template content in the VisualEditor
|
|
|
Nested templates
|
| Templates can include other templates as the value for parameters. You’ll recognize it when you see a parameter whose value contains the double curly braces ( {{ }} ) denoting a template.
The VisualEditor can’t present this template within a template (a nested template) using the editor’s easy-to-use interface, so if you want to nest a template yourself, you’ll need to understand how to add the template by hand in wikitext into the appropriate parameter field.
|
 Embedded template in the VisualEditor Embedded template in the VisualEditor
|
|
|
Completing your edit
|
| When you have finished editing a template, you can click "Shrani spremembe".
Then you can preview your edit and make sure it looks the way you want and expect.
You may also see an error message, which (like the other TemplateData mentioned above) is community-provided content and may vary in usefulness.
You may need to consult the template’s own documentation to get to the bottom of some errors.
If you’re still having trouble, consider posting about your problem on the template’s talk page.
|

|
|
|
Removing a template
|
| To remove a template in the VisualEditor, click the template box.
Press the "Delete" or "Backspace" key on your keyboard.
The template will disappear from the page.
|
 Removing a template in the VisualEditor Removing a template in the VisualEditor
|
|
|
Editing on mobile
|
| When editing a template on a page using the VisualEditor on a mobile device, you’ll see that the sidebar starts out hidden. You can make it visible by pressing the “Show/hide options” button.
|
 Editing a template on mobile in the VisualEditor Editing a template on mobile in the VisualEditor
|
|
Zamenjava predloge
|
| When you insert a template in a wiki page, its content and appearance are reevaluated every time the page loads, based on the template code and the values of its parameters.
This means if someone updates the code of a template, then every page which uses that template will also get updated when they publish.
There’s another, much less common way to use templates, though, and that’s to
substitute
a template.
Doing this permanently includes the template content just as it appears at the moment you insert it. It will not update if the template code is later changed.
Most users won’t ever need to resort to substitution.
Substitution is typically only useful when you need to capture the exact appearance of one version of a template, such as when content is under development and needs evaluation.
To substitute a template in the VisualEditor, insert a template using the name syntax
subst:<template name>
.
Then press the blue “Dodaj” button.
When you’re finished, press “Vstavi”, which will insert the template content as you see it.
|
 Adding a template using SUBST in the VisualEditor Adding a template using SUBST in the VisualEditor
|